NZ Garlic Growing Guide: From Clove to Superfood Harvest
Growing your own garlic in New Zealand is not just incredibly satisfying; it's surprisingly easy and rewarding. This pungent powerhouse, often dubbed a garden superfood, adds robust flavour to countless dishes and boasts an impressive array of health benefits. Whether you're a seasoned green thumb or just starting your gardening journey, garlic offers one of the most straightforward paths to a homegrown harvest. This comprehensive guide will walk you through every step, from selecting the right time to plant to enjoying your delicious, nutrient-packed bulbs.
When to Plant Garlic in NZ: Timing for Success
One of the most frequently asked questions for aspiring garlic growers in New Zealand is, "When to plant garlic NZ for the best results?" The good news is that garlic is quite forgiving, but optimal timing can significantly impact your harvest quality and size. Traditionally, many gardeners adhere to the adage of planting on the shortest day (around June 21st) and harvesting on the longest day (around December 21st). While this is a charming rule of thumb, the reality is a bit more flexible, allowing for planting throughout late autumn and winter.
In New Zealand, the prime planting window for garlic generally spans from April to July. Planting during this period allows the garlic cloves to establish a robust root system before the coldest depths of winter arrive. This early root development is crucial for giving your plants a strong foundation to thrive once temperatures begin to rise in spring. While specific timing can vary slightly depending on your local climate and microclimates – milder winter regions might plant a little earlier, while colder areas might wait until closer to July – the key is to get those roots going before the most extreme winter conditions set in. For a more detailed, season-by-season breakdown, you might find our guide on When to Plant Garlic in NZ: Your Seasonal Guide particularly helpful.
Regardless of the exact date, the goal is to have the cloves in the ground, ready to send out shoots within a month or so, and then benefit from the cool, moist conditions that encourage strong vegetative growth before the bulbs begin to swell in late spring and early summer.
Preparing Your Garlic Patch: The Foundation for Flavour
Great garlic begins with great soil. As a heavy feeder, garlic thrives in nutrient-rich, well-draining soil that receives plenty of sunlight. Choosing the right spot and preparing the soil effectively are fundamental steps to a bountiful harvest.
- Location, Location, Location: Select a site in your garden that receives full sun – ideally at least 6-8 hours of direct sunlight per day. Garlic loves sunshine!
- Soil Enrichment: If you're using an existing garden bed, dig in plenty of organic matter. This could include well-rotted compost, sheep pellets, or other aged manures. Organic matter improves soil structure, drainage, and fertility, creating the ideal environment for garlic roots to expand. For new beds or potting, a high-quality vegetable mix is an excellent starting point.
- Nutrient Boost: Before planting, adding a layer of good quality vegetable mix on top of your prepared soil will provide an initial boost of essential nutrients. This ensures your young garlic cloves have immediate access to the food they need to start strong. If planting in pots or containers, simply fill them with a suitable vegetable mix.
Remember, the better your soil, the better your garlic will grow. Investing time in soil preparation now will pay dividends in the form of larger, healthier bulbs later.
From Clove to Garden Bed: The Planting Process
Once your soil is ready, it's time for the exciting part: planting! But don't just grab any garlic from the supermarket shelf – there are a few important considerations.
- Choose Wisely: Avoid planting garlic purchased from supermarkets, especially if it's imported. These bulbs are often treated to prevent sprouting, which defeats the purpose. Instead, source your garlic bulbs from reputable garden centres or specialist garlic suppliers in winter. Look for firm, healthy bulbs free from blemishes.
- Break it Down: You plant individual cloves, not the entire bulb. Gently break apart your chosen garlic bulb into separate cloves, being careful not to damage their basal plate (the flat end where roots emerge). Use only the largest, healthiest cloves for planting, as these tend to produce the biggest bulbs.
- Planting Depth is Key: This is a critical step often overlooked. Each clove should be planted about 5cm deep, or roughly twice the length of the clove itself, with the pointy end facing upwards. Shallow planting is a common mistake that can lead to significant problems, such as plants falling over as the heavy leaves develop, potentially pulling the entire plant out of the ground. For more insights on this crucial technique, explore our article on Deep Planting Garlic in NZ: Grow Bigger, Healthier Bulbs.
- Spacing: Give your garlic room to grow! Plant individual cloves 15-20cm apart. Garlic bulbs can grow surprisingly large, sometimes as big as a leek, so adequate spacing prevents overcrowding and competition for nutrients.
- Container Growing: Garlic is very happy in pots and containers, making it perfect for smaller gardens or patios. Choose a container with good drainage, roughly the size of a kitchen bucket, and you can comfortably plant about six cloves. Fill with a good quality vegetable mix and follow the same planting depth and orientation guidelines.
After planting, shoots should emerge within a month or so, signaling the beginning of your garlic's journey.
Nurturing Your Garlic: Care During Growth
While garlic is often described as a low-maintenance crop, providing consistent care during its growing season will ensure a superior harvest.
- Feeding: Garlic plants are hungry! They deplete soil nutrients as they grow, so regular feeding is essential. For garlic planted in garden beds, apply a balanced vegetable food every 4-6 weeks throughout the growing season. Look for formulations rich in dolomite, blood and bone, and sheep manure dust, which not only feed your plants but also encourage healthy microbial and earthworm activity in the soil. An alternative is a slow-release premium fertiliser that can be reapplied every 12 weeks. For container-grown garlic, a liquid feed every few weeks works well.
- Watering: Keep your garlic consistently watered, especially during dry spells. This is particularly crucial in late spring and early summer (November and December in NZ) when the bulbs are actively forming and swelling. Insufficient water during this period can result in smaller, less robust bulbs.
- Weeding: Keep the area around your garlic free of weeds. Weeds compete for water and nutrients, which can stunt garlic growth. Hand-weeding is often best to avoid disturbing the shallow garlic roots.
- Pest & Disease: Garlic is generally quite resilient. Keep an eye out for common garden pests, but often good soil health and plant vigour will prevent major issues. Ensure good air circulation to minimise fungal problems.
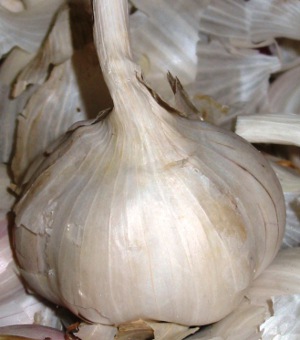
Harvesting Your NZ Garlic Superfood
After months of patient growth, the reward is finally at hand! Knowing when to harvest is just as important as knowing when to plant garlic NZ. As a general guide, garlic is typically ready for harvest around the longest day of the year (December in New Zealand), approximately 6-8 months after planting.
Look for these visual cues to determine readiness:
- Yellowing Leaves: The lower leaves of the garlic plant will begin to yellow and brown, with approximately one-third to half of the leaves dying back.
- Still Some Green: Crucially, don't wait until all the leaves have completely died back. You want to harvest while there are still 3-4 green leaves remaining, as these contribute to the final sizing and storage potential of the bulb.
- Developing Scapes (Hardneck varieties): If you've planted hardneck garlic, it will produce a flower stalk called a "scape." While beautiful, these should be removed when they curl into a pig's tail shape. Removing them redirects the plant's energy into bulb development rather than flower production, resulting in larger cloves. You can eat the delicious scapes too!
To harvest, gently loosen the soil around the bulb with a fork or spade, then carefully pull the entire plant out of the ground. Avoid pulling solely by the stem, as it can snap off, leaving the bulb behind. Once harvested, resist the urge to wash the bulbs. Instead, gently brush off any excess soil.
Curing: Curing is essential for good storage. Tie your garlic in bundles of 5-10 plants and hang them in a cool, dry, well-ventilated spot (like a shed or garage) for 2-4 weeks. Once the outer wrappers are papery and dry, and the stems are completely dry, you can trim the roots and stem (leaving about 2.5cm of stem) and store your homegrown superfood in a mesh bag in a cool, dark place. Properly cured garlic can last for many months!
Conclusion
Growing garlic in your New Zealand garden is an incredibly rewarding experience, offering both the satisfaction of self-sufficiency and a steady supply of a versatile, health-boosting ingredient. By understanding when to plant garlic NZ, preparing your soil thoughtfully, planting correctly, and providing consistent care, you'll be well on your way to harvesting your very own fragrant, flavourful, and utterly delicious garlic superfood. Happy gardening!